Cirkus helps you estimate project costs, prepare Quotes and present them to your clients.
You can build Quotes from scratch, use existing Quote Template, and pull in Rates from your workspace to speed things up.
Quotes are created under Projects.
TABLE OF CONTENTS
- Before you begin
- Create a Quote
- Details of a Quote
- Export to PDF and Mark as Sent
- Other Quote Operations
- Related articles
Before you begin
- You'll need to have Quotes and optionally Rates permissions enabled for your user, and have a Business Tier license
Create a Quote
- As a Project Administrator with Workspace Quotes Permissions and double-click the Project where you would like to add a Quote
- Click the Quotes tab to open the Quotes list
- Type a name for the new Quote in the Quick Entry and click [Add Quote]

- Optionally select a Template, Status and Currency.
Optionally select a Contact. If a Company has been selected on the Project this can only be a contact of that company.
The Description can be printed on the PDF generated for your Quote.
Click OK/Add Quote (or Done on iOS)
- When the Quote is created it is listed in a list with other quotes from the Project. The list has an active/inactive/removed , and status filter

- Click on a Quote cell to preview it in the Inspector, or click on the name (double click on mac) to access more of the details and work with the Quote
Details of a Quote
Info
In the Info tab, you can view and edit some key information about each Quote.
Name: The name applied to the Quote on creation. This can be changed
Template : The Quote template used if Any (you can also Save a Quote as a Template from this menu)
Number : An automatically generated quote number. Quote numbers are unique within each project and cannot be changed
Project : The project where a quote lives
Contact: This can optionally be set at Quote level, if it’s not set, the Company and Contact of the project will be available to print on the PDF.
Active : Toggle to make a quote inactive (it moves to Inactive list)
Status : Choose from a list of statuses available in the workspace. These are defined in the Workspace > Quote Settings. If a default is defined on the workspace it will be pre-selected.
Currency: select from a drop down of currencies available to use in your Workspace Financial settings)

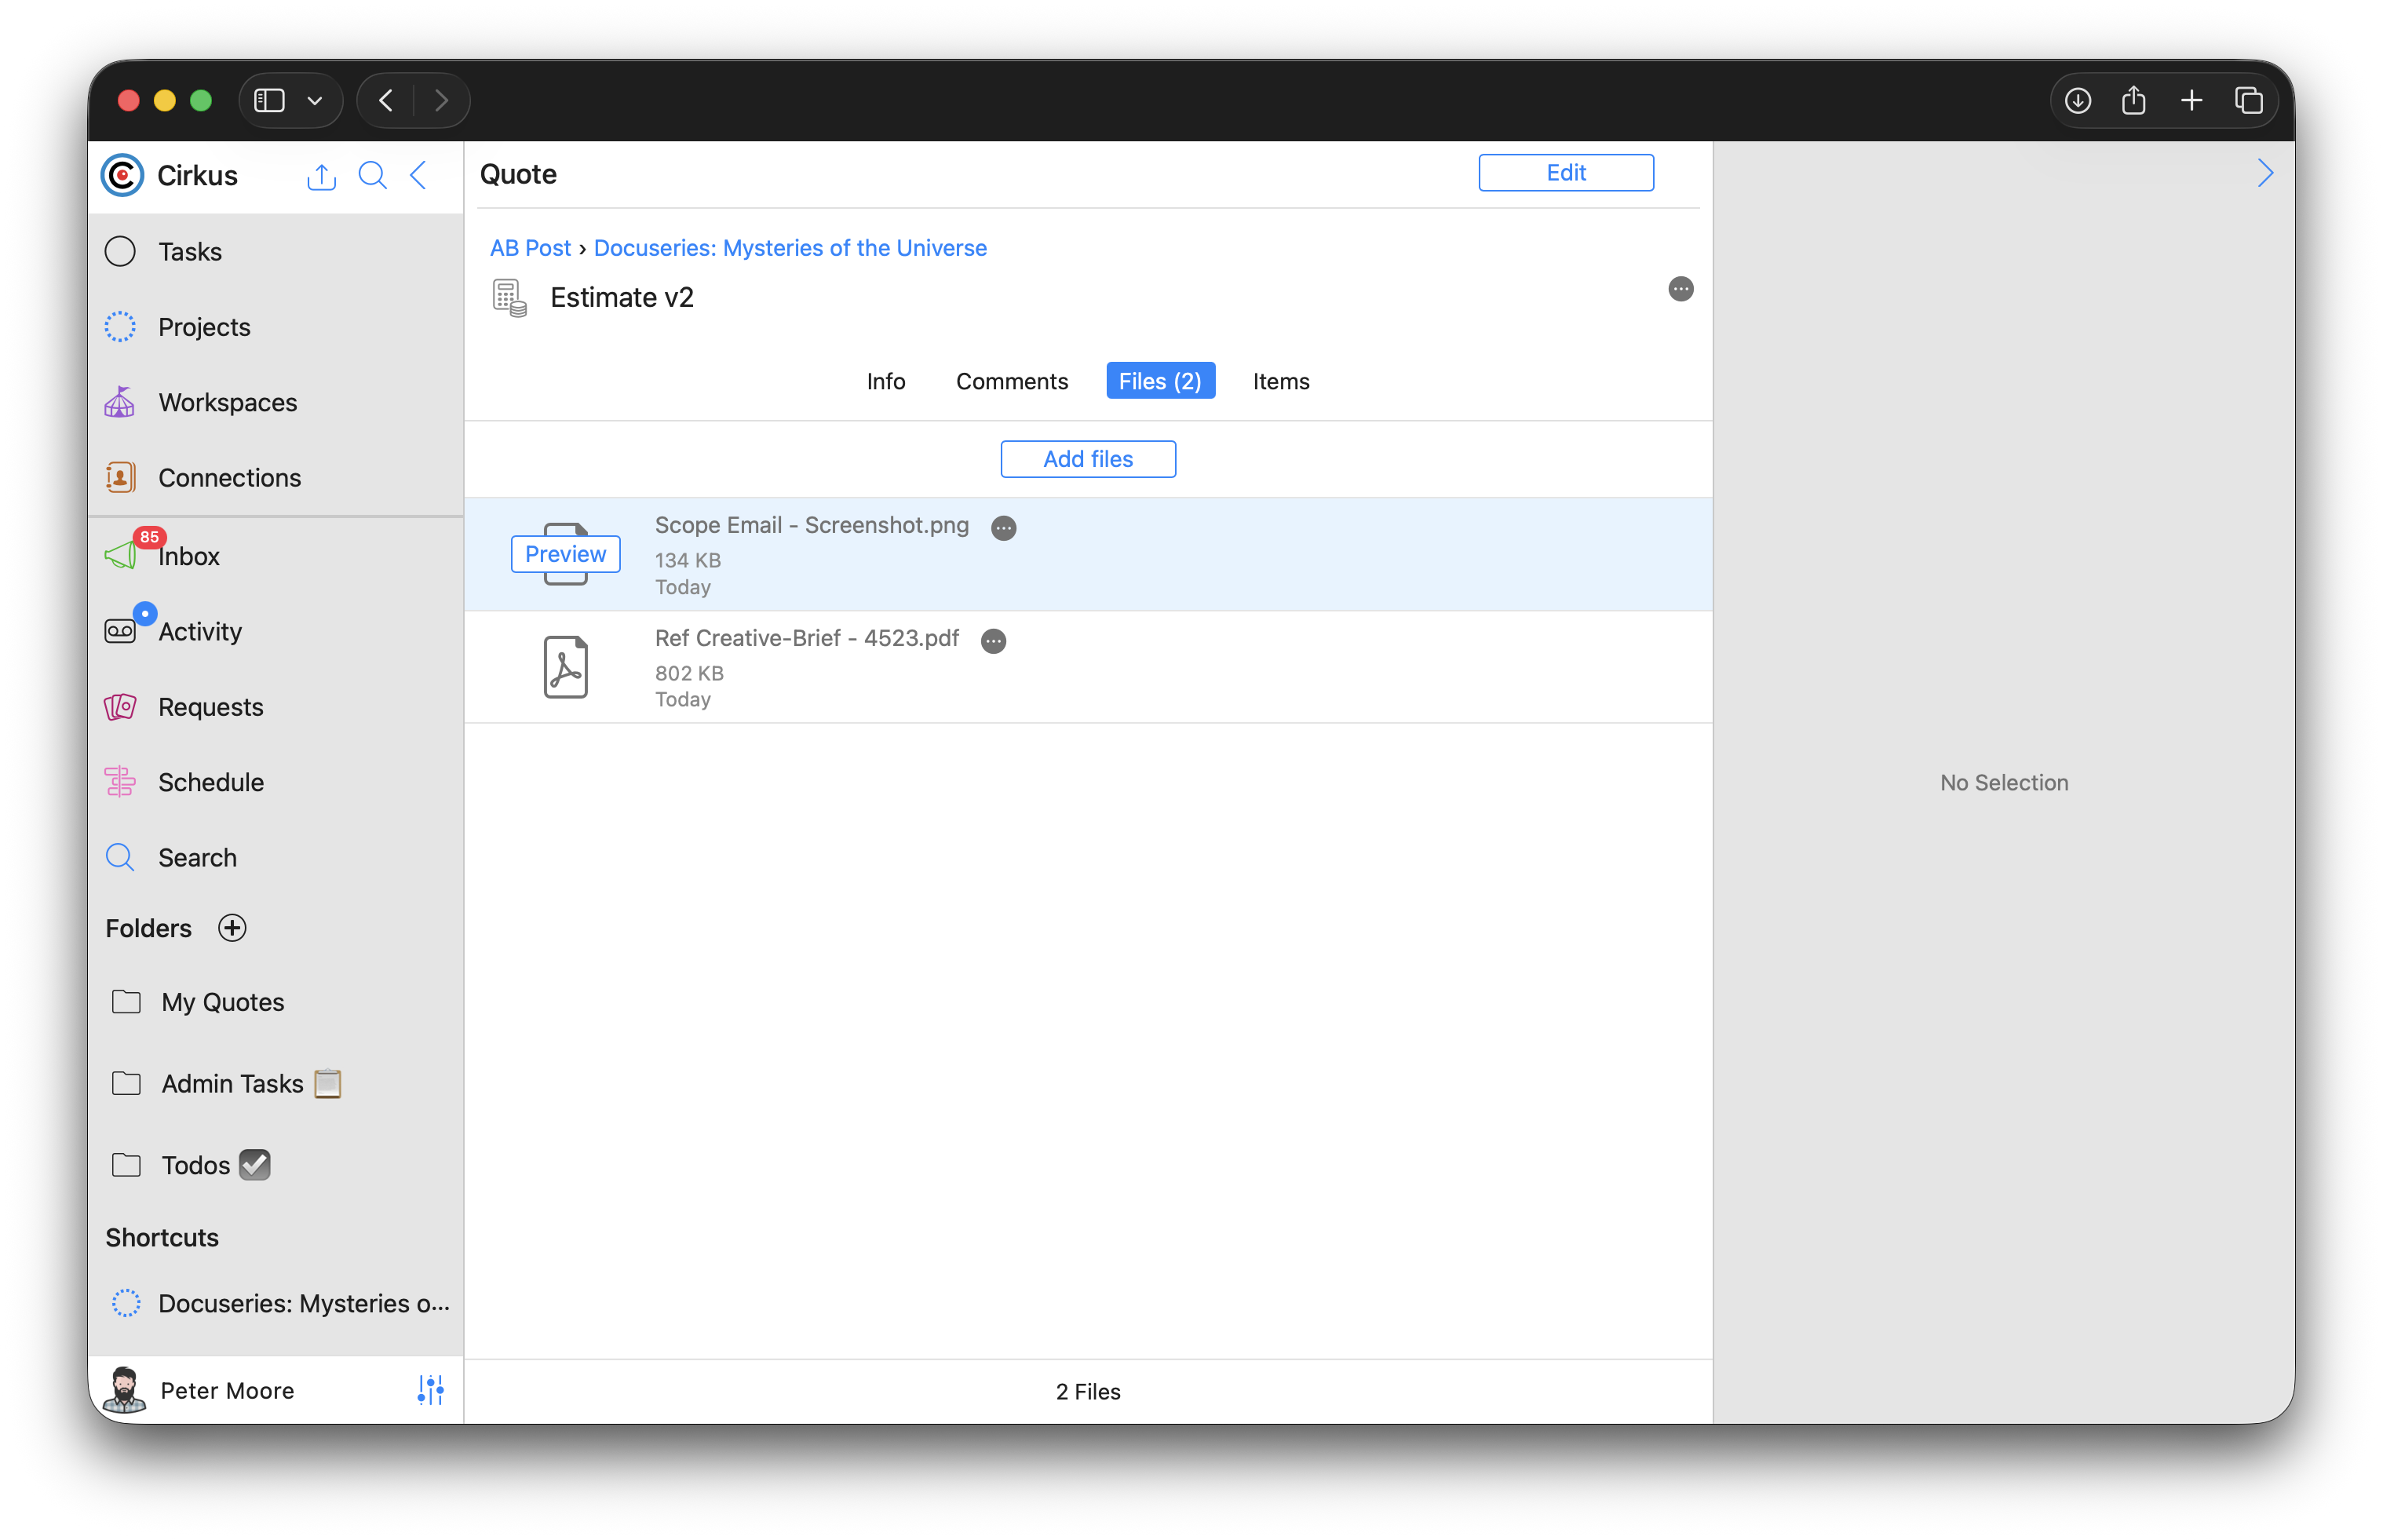
Comments & Files
Each Quote has a Comments and Files sections to keep internal notes or communicate updates.
There are also notifications (inbox, push, email) for all quote status change and comments.

In Files you can upload and preview files linked to each quote with drag and drop or file browser to include files which are relevant to the Quote, such as creative brief, scope documents, approval evidence etc.
Items
In the items tab is the real content of your Quote.
In the example we created we used a template so many Items are already populated in their Categories.
You can see the Name, Multiplier, Quantity, Discount and Total for each line item, as well as the total per Category and the Total of the Quote.
Here you can add new Categories, SubCategories and Line Items for the work being quoted, or edit the existing ones.

You can Edit the columns you see, and their width in this view. Right click on any column heading to update the columns in the view.

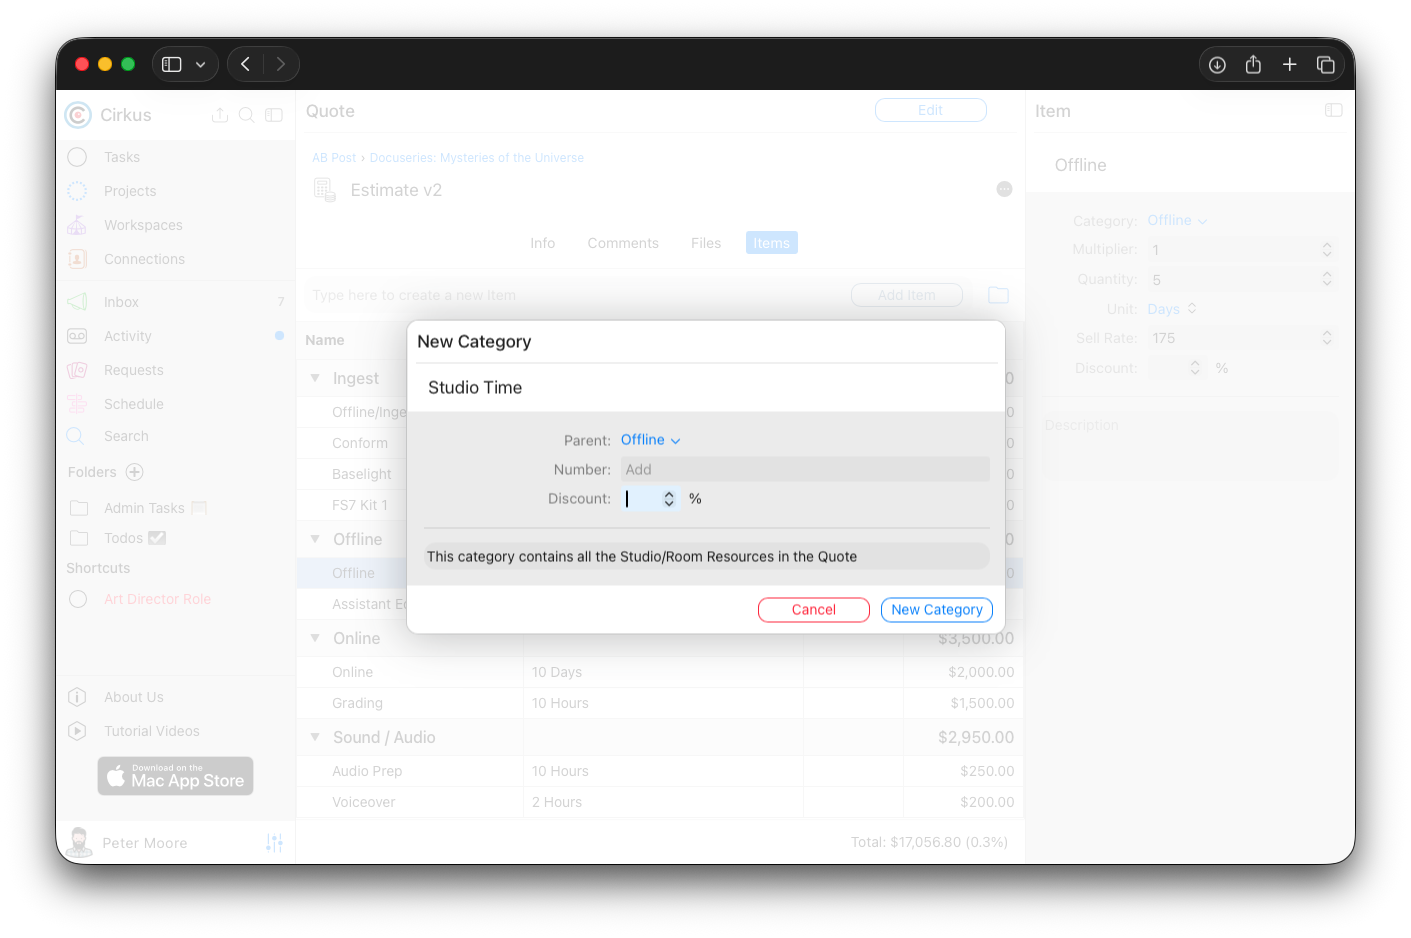
Add a New Category
Add new Categories (e.g., Design, Production, Equipment) to the Quote by clicking on the folder icon on the right.
In the Category Sheet, select a Parent Category if this is to be a Sub-Category, or select none if it’s a top level Category, optionally add a Number for the Category and a description, and a discount.
The discount will be applied to the category total.
Add a New Item
Add new Items to the template by typing in the entry field and clicking Add Item or enter key.
If the Item matches an object in the workspace - Role, Member, or Resource - it will be offered for selection when typing in the field, and Workspace Unit and Rate information will be repopulated. (See Rates article)
If the Item name does not match any workspace object, it will be considered an adhoc item and manually populated.
In the New Item sheet optionally select:
Category - optionally place the item in a Category or Subcategory. You can also create a new category by typing it’s name
Multiplier - optionally apply a multiplier (e.g for 5 episodes x5)
Quantity - quantity of the unit which should be added (hours, days, units, custom)
Rate (pulled from Workspace Rates or entered manually)
Discount - discount % to be applied on this item
Description - description of the item
If the Workspace setting "Copy Object Description to Line Items” is true in the workspace the Member/Role/Resource Description will be copied from the Workspace to the Line item.
Click Add Item and the Item is added

Edit Categories and Items
To Edit the entries in the Items view
Each Item and Category can be loaded in the Inspector and edited individually

to Edit Multiple Items click on the Edit button in the top right of the Main View

This will open a grid style view where you can edit multiple items and use your keyboard to tab between the entries.There is also an option to select and delete multiple items at once

When the changes are Done, click [Done] to commit them.
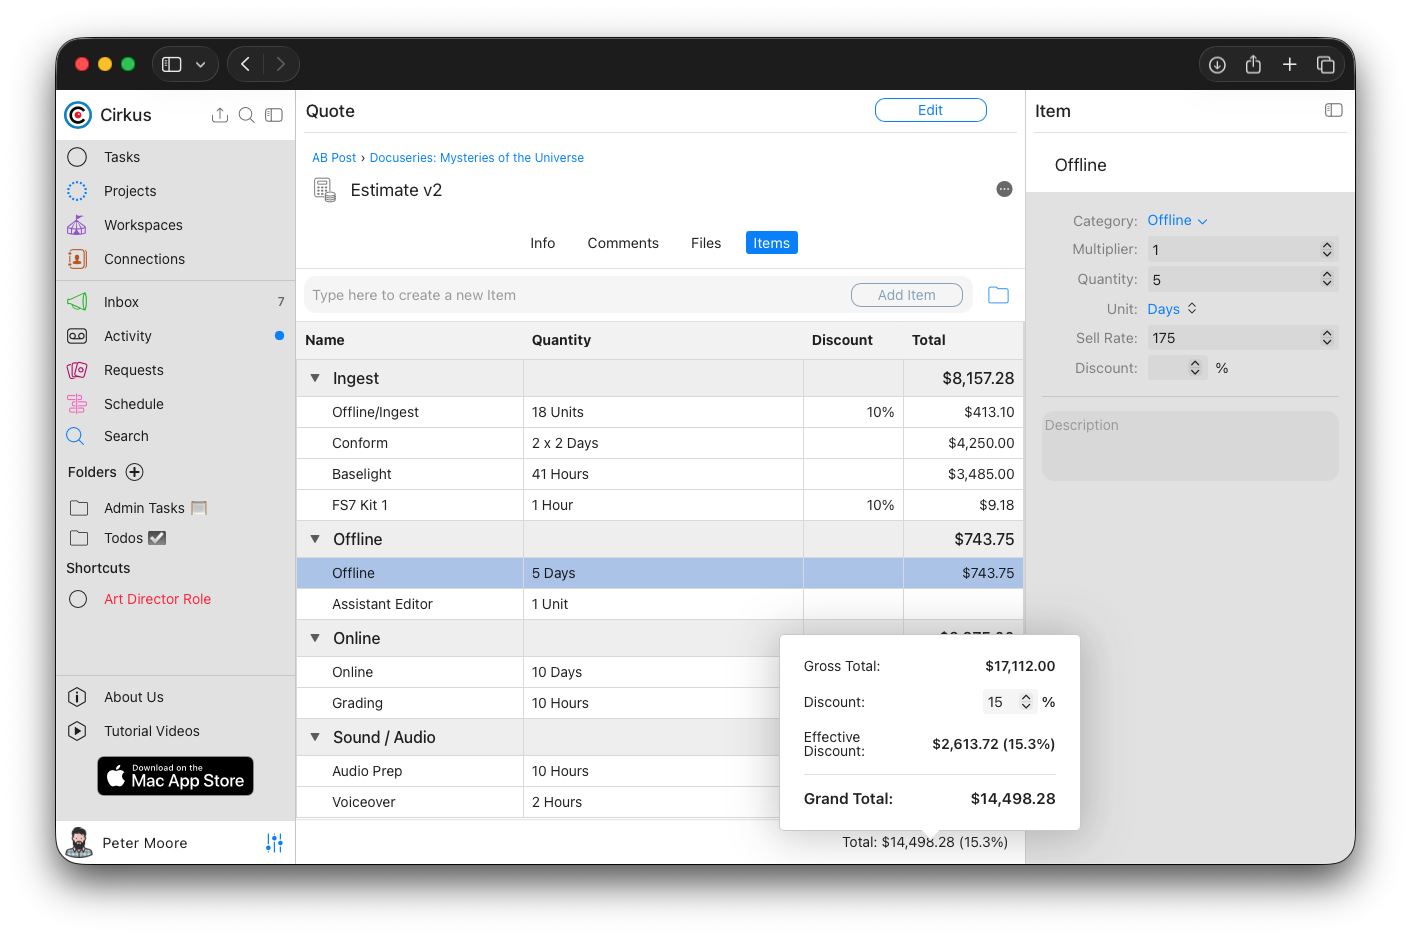
Applying discounts to a Quote Total, Category or Item
You can apply a global percentage discount to the final Quote Total by clicking on the total in the bottom bar.
You can also apply discounts at Item and Category level by selecting them and updating the discount % in the Inspector.
These discounts will be shown in the PDF , but can be excluded if they are unchecked in the PDF Options.
The "Effective Discount" is the total of all discounts applied throughout the quote - at Line, Category and Total level.
Export to PDF and Mark as Sent
In the options menu, click Export as PDF to generate a client-ready document.
Go to the options (⋯) menu and select Export to PDF

In the preview dialog, review or update the defaults (set in the Workspace > Quote Settings), or continue to print with these settings 
Your Workspace logo (set in Workspace Settings) will appear on the top of the PDF.
The Workspace > Quote Settings > Issuer Address will appear below the logo
The client’s Company information as linked in the project will be included automatically, if a Contact is set on Quote level it will be printed in the PDF
The Project name can be toggled to show or not in the PDF
The Quote Description will be the introduction text, markdown is supported if added in Cirkus it will show in the PDF. You can control whether the Description is included using the Description toggle in the PDF settings.
The Reference for the quote will be the Project number- Quote number
Issued By is the Quote Creator (this can be changed - see below Changing Quote Creator)
A summary of each Category is printed first, and then the detail of the line items and then the total
Page breaks can be inserted between sections — this can be configured in the Export to PDF dialog or set as a default in Workspace > Quote Settings.
 |  |
When the pdf is sent, mark the Quote as Status: Sent

Other Quote Operations
Duplicate Quotes
You can also Duplicate your Quote if you want to create a new similar one.
On mac: right click a Quote > Duplicate Quote
On web: Edit > Select one or more Quotes > More Actions > Duplicate
On iOS: Swipe on a Quote >More (...) > Duplicate
This will create a new Quote appended with the word “Copy” to the name

Change Quote Creator (Issued By in PDF)
You can edit the Quote Creator, which will update the “Issued By” Contact in the Quote PDF
Go to the Quote Comments, and find the Created event at the end of the history.
Select from the Workspace Members to update the Quote creator.

Save a Quote as a Template
If you want to reuse the quote you have you can save it as a template
In the Quote > Info tab, select Save as Template

In the sheet that appears select a name for the template and some defaults and “Save as Template"
Learn more about Quote Templates here
Advanced Search
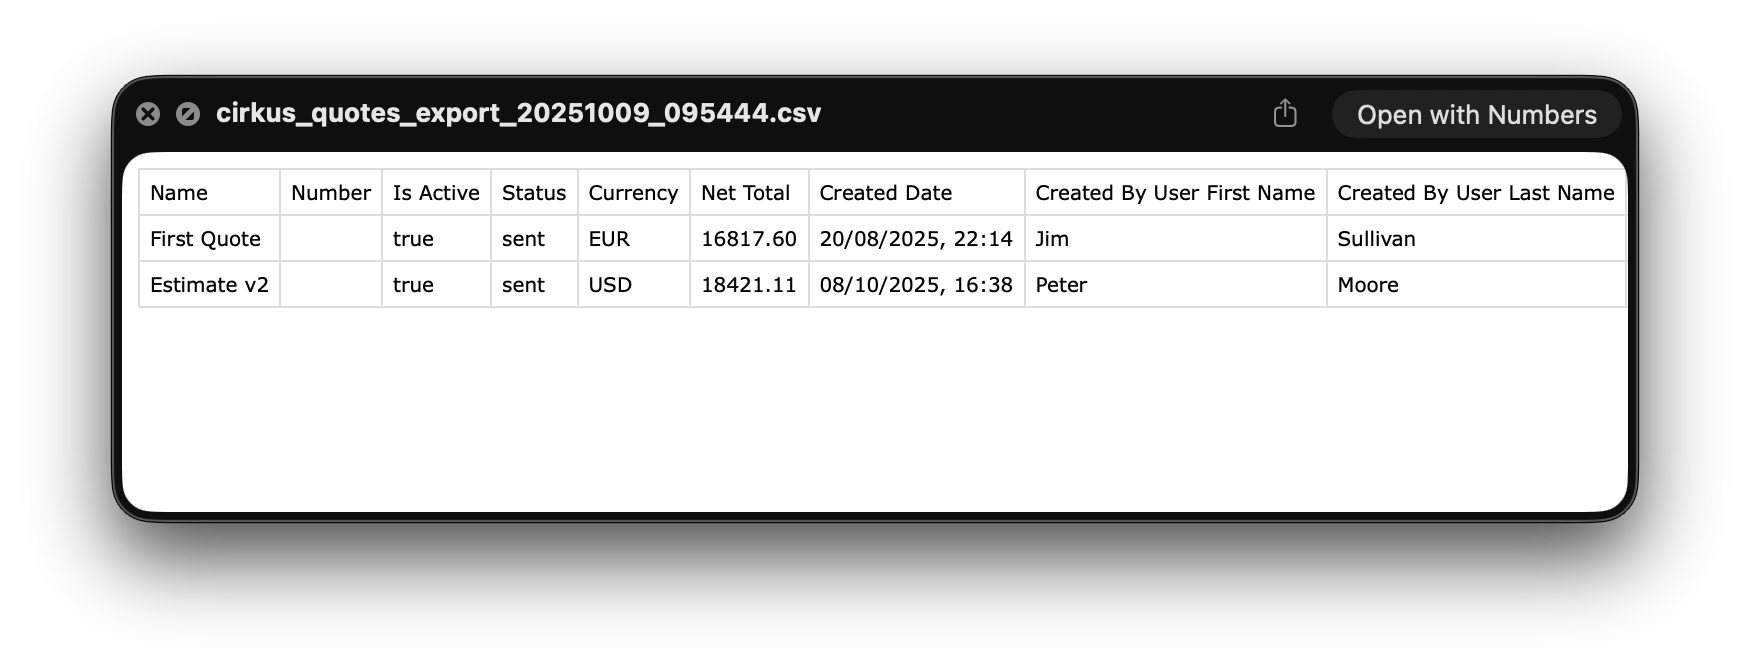
You can search for Quotes in your workspace using Advanced Search, and save searches that you regularly use.
You can search by Quote Fields or Statuses, and also search for Quotes based on the Project fields and conditions.
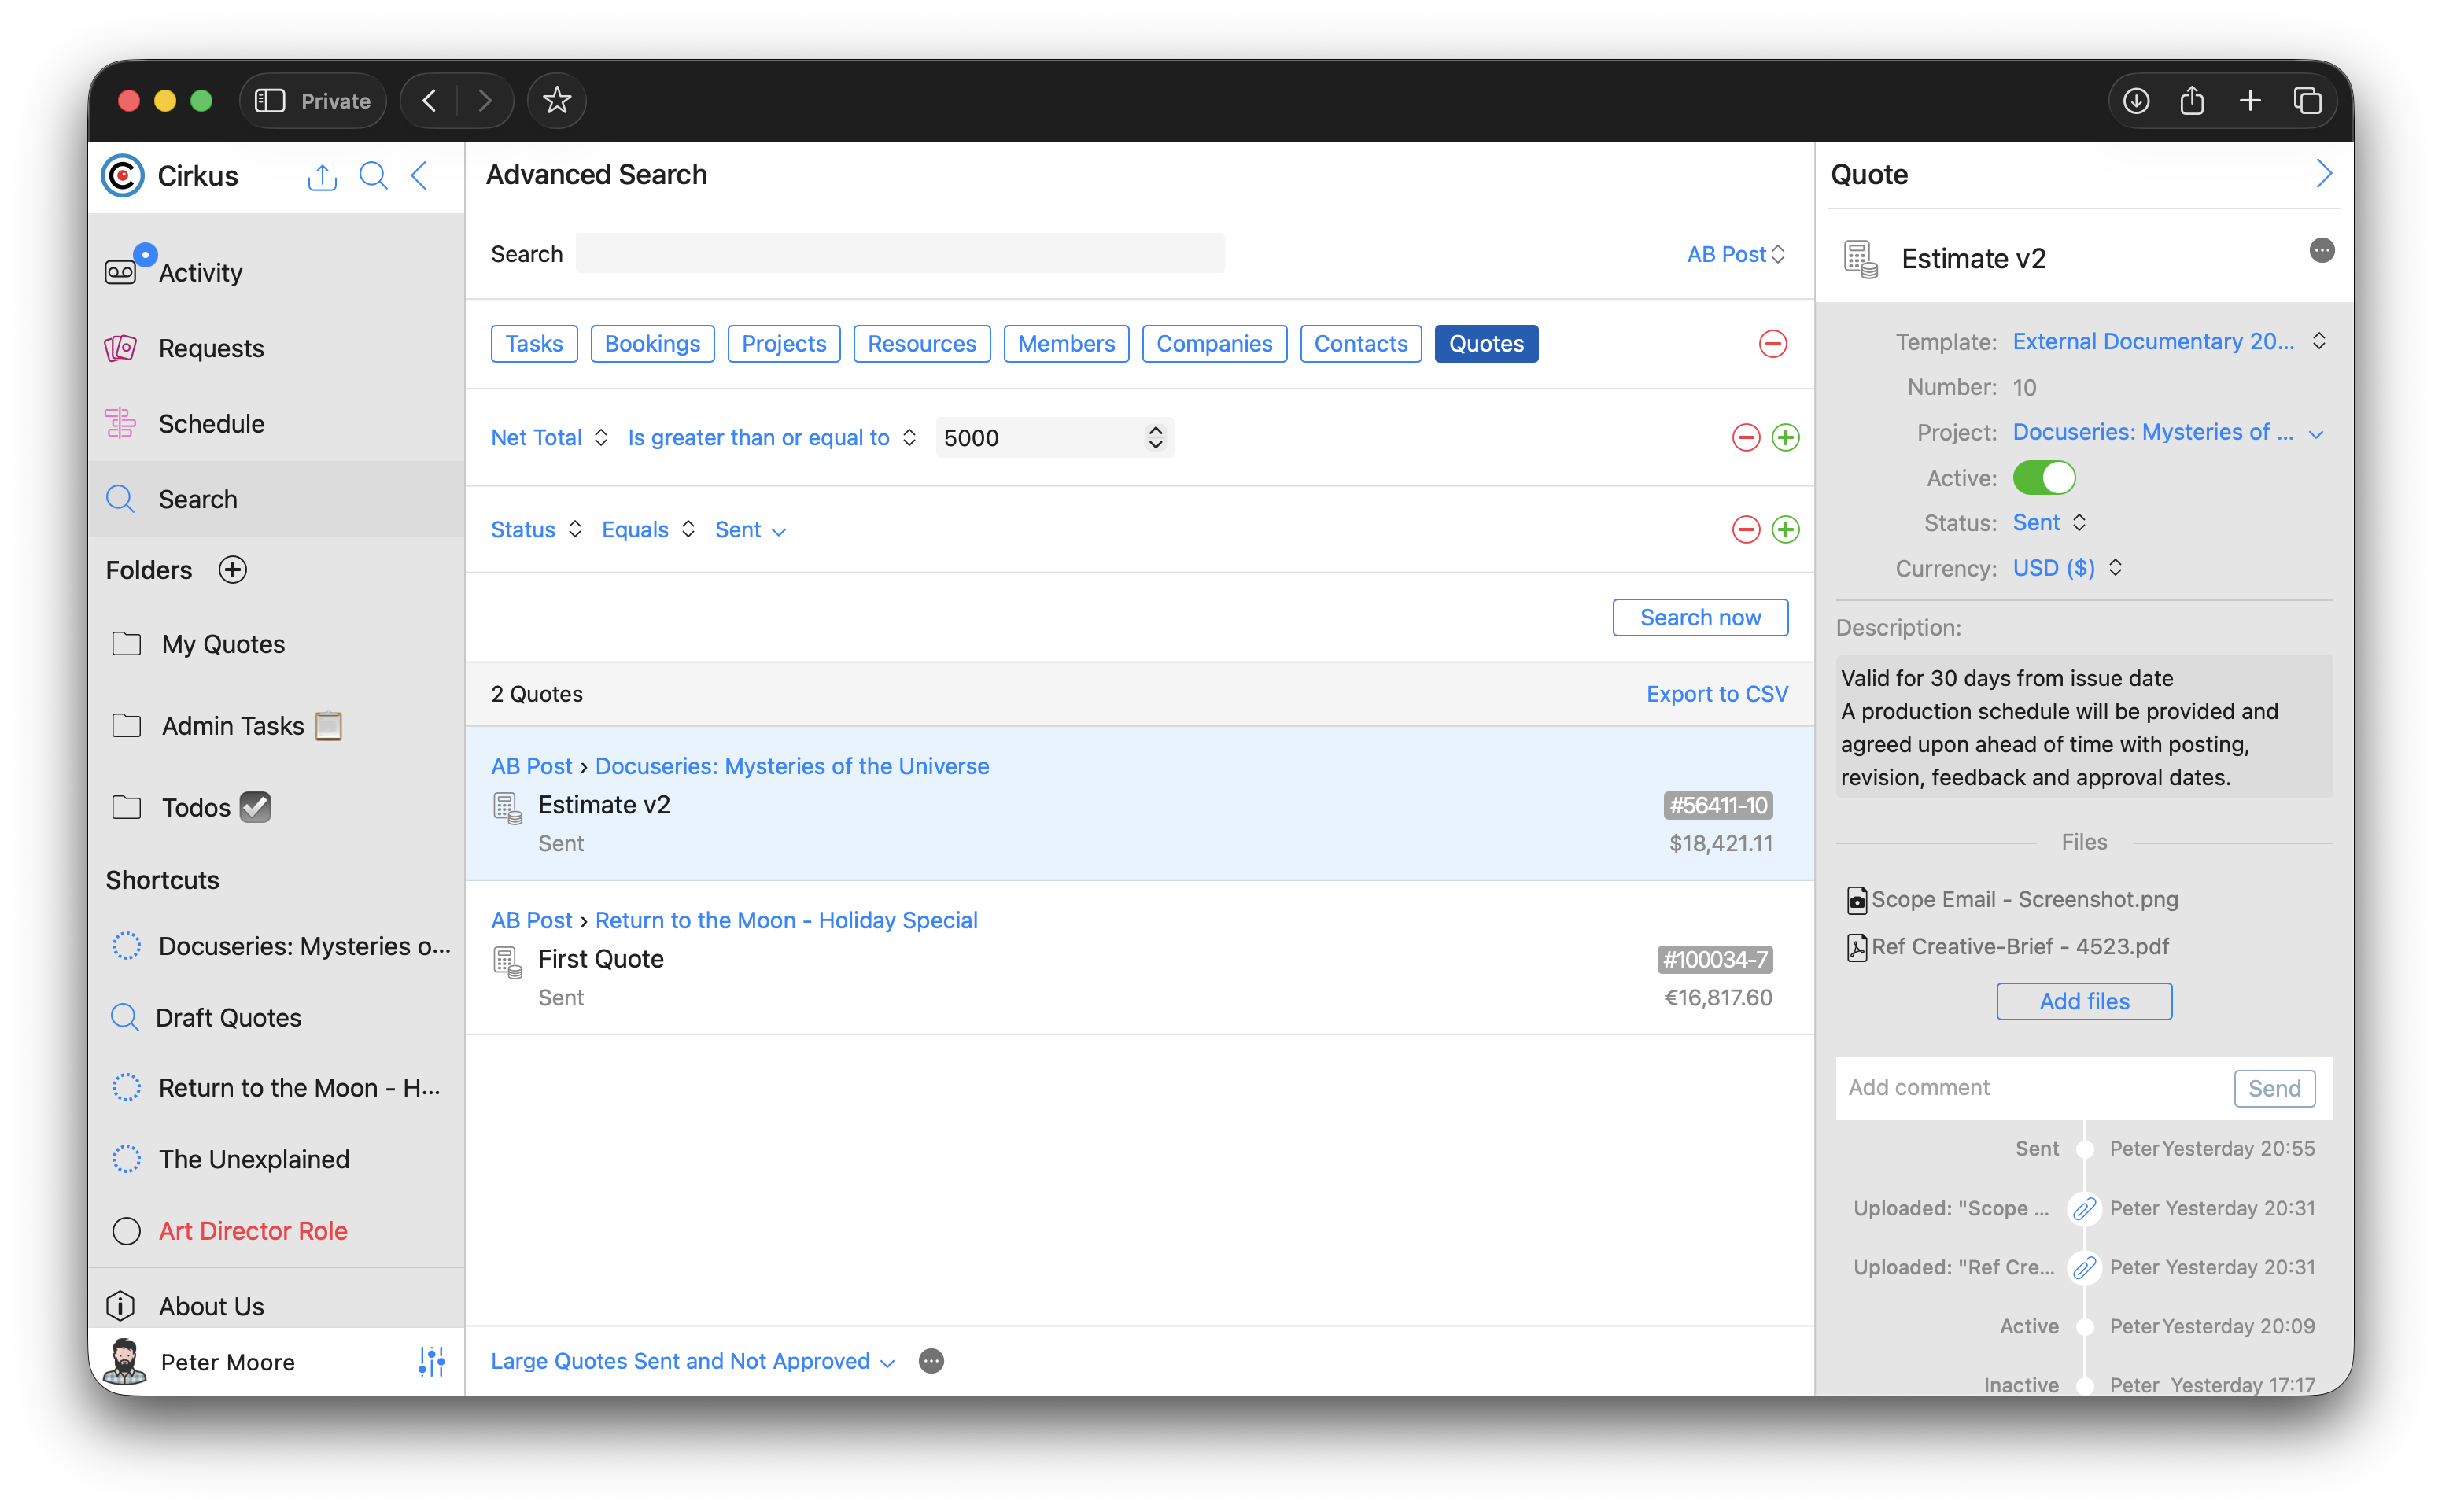
You can export search results to csv and choose which Quote fields to include in the output file, example below.
The csv will have one line per Quote, with the totals, category totals and fields of that Quote.
*Note* only categories which are defined on Quote Templates are available for selection when exporting Quotes to CSV. Adhoc or renamed categories will be skipped
Ready to know more, dive into our related articles
Related articles
Was this article helpful?
That’s Great!
Thank you for your feedback
Sorry! We couldn't be helpful
Thank you for your feedback
Feedback sent
We appreciate your effort and will try to fix the article