You can use Cirkus to schedule Members, Roles or Resources in your team and see at a glance what they are working on.
You will need to have a Workspace to schedule your team.
- In a Free Workspace, you can create unlimited Bookings and schedules for your team.
- In a Pro Workspace (or your on-premise Cirkus server), you can also manage bookings for equipment and rooms, and you can invite a larger team. for more information on our Pro plans visit https://cirkus.com/pricing
TABLE OF CONTENTS
- Ways to Schedule
- Adding Resources to your Workspace
- Keyboard Shortcuts in the Schedule Views (mac only)
- Scheduling Bookings
- Scheduling Tasks
- Customise your Schedule View
- Scheduling by Project - Schedule and Bookings list
Ways to Schedule
There are a number of ways to plan your work on the Schedule
Scheduling Bookings
If you use Bookings to schedule work, you can add Members, Roles and Resources to the Booking and select a start and end date for the work.
- You can also link one Booking to a single or multiple Tasks, Subprojects or Projects to indicate what work is involved.
- You can attach files, comment and time report on Bookings.
- Bookings have a start and end date, and each booked Involved also has dates which can be edited.
- Future Recurring Bookings are booked out in the schedule
- Those involved in Bookings do not need to mark a Booking as Done.
- If can Time Report on Bookings and the total will feed up to the Projects (if there are more than one linked reference the time will be divided between them)
Scheduling Tasks
If you use Tasks to schedule work, you can add Members and Roles and Resources to the Tasks, and select a start and end date for the work.
- A Task is part of only a single Project (and optionally Subproject)
- You can attach files, comment and time report on Tasks .
- Tasks have a start and end date, and each Task assignee also has dates which can be edited.
- Recurring Tasks are created at their recurrance time, and future Tasks are not mapped out in the schedule
- Those assigned to tasks have a status (Done, Not Done, In Progress, On Hold) where they indicate the work is done.
- It's possible to "Book" additional people or resources on a Task who are not Assigned (i.e do not have a status)
- You can Time Report on Tasks and the total will feed up to the Project.
- Subtasks can also be scheduled too.
- You can also link a Booking to one or multiple Tasks, if you do this the Bookings will show in the Bookings tab of the Task Details.
In your team you can use one or both of these to plan your work.
Adding Resources to your Workspace
You can add Resources, like rooms or equipment to your Workspace, and they will be bookable on Bookings and as Resources on Tasks.
To set up Resources as a Workspace Admin, go to Workspaces in the left menu, and double click the workspace name.
Note: You will need to have a Pro Workspace to add resources.
Select “Resource Categories” and add a grouping for your resource type, click [Add Resource Category].
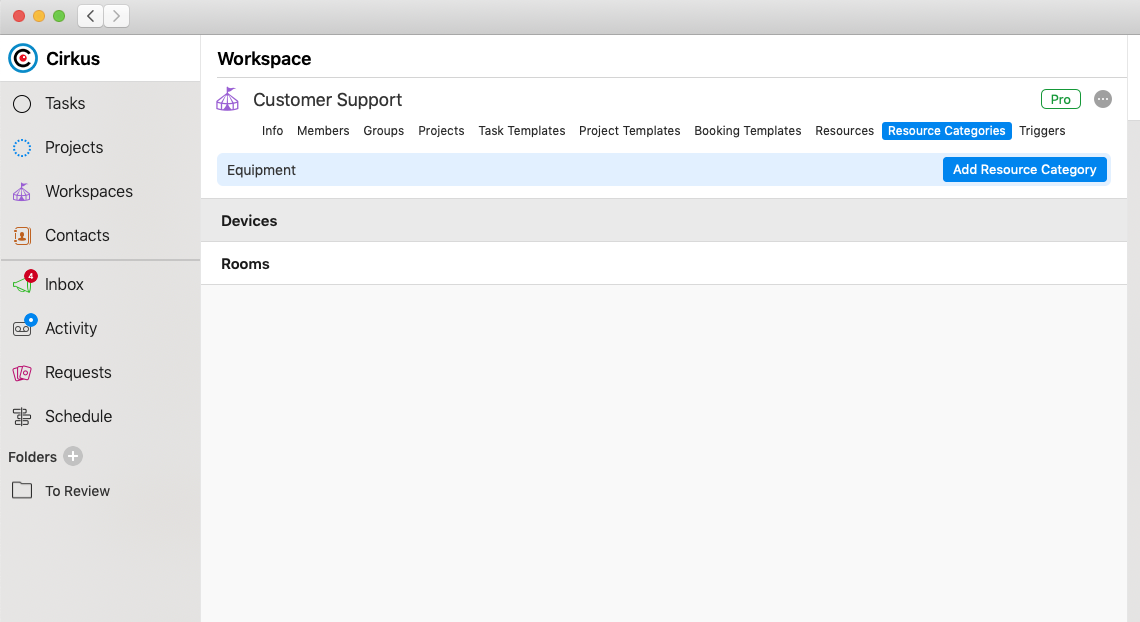
Now go to “Resources” and we can add some Resources to that Category.
Optionally add an icon for each resource that you include.
Back in your schedule, the new resources will appear on the left in their resource category.
Keyboard Shortcuts in the Schedule Views (mac only)
In the mac application, there are several keyboard shortcuts available.
These can be viewed at any time in the View menu.
Key actions include:
Zoom - CMD+ and CMD- will zoom in and out
Scroll - Left and Right arrows will scroll to next view port
Today - CTRL+T will jump to Today in the current zoom level

Scheduling Bookings
Go to the Schedule item in the left menu.
By default you can see your own Tasks and Bookings, you can use the filter on the top left on mac, or bottom right on web/iOS to switch between your own Schedule and that of your Workspace.

In the Workspace view, all of the Members of your Workspace are displayed on the left, grouped by their role if you use Roles.

Create a New Booking - web and macOS app
Click and drag to create a placeholder Booking on the Role or Member you would like to book.
You can click and drag to create multiple placeholders before clicking the [+] button to create more complex bookings.
Note: after creating the placeholders you can select Add Task, or Add Booking from the + menu on top right on web, or bottom left on mac. By default the + action opens a New Booking sheet, on mac you can hold down the option key to create a New Task instead.

Create a New Booking - iOS app
on iOS in the Schedule, you can long press on a resource row at the desired time and it will open the New Booking window.
alternatively click the + Add Booking button.
Populate the Booking Details
In the New Booking, the resources and times selected in the placeholder will be populated, and you can select Members, Roles and Resources to add.If some of the Involved are unavailable (already booked on a Scheduled Task or Booking at the selected time), this is indicated by an orange dot in the Involved selector

Fill in the details, and color, and optionally associate the booking with a Project, Subproject, or Task.
If you can't find the Project or Task you are looking for, or you want to create a new one, you can do so from the selectors here using the [Add Task], or [Add Project] options.

You can also optionally add Schedule Status to your Booking if they are configured for your Workspace. Find out more about Schedule Statuses in this related article
Click OK and the booking is made.
You can inspect the booking on the Inspector pane on the right, to quickly see the Project information click the Info icon (i) to preview Project information without leaving the Schedule view

The people involved will be notified that they have been added to a new booking, and of any subsequent changes.
From the notifications you can click "See In Schedule" to be brought to that Booking in the Schedule view.

Collaborate, Edit, and Update Bookings
Add Comments, Files and Collaborate
You can collaborate on a booking as you do on a Task, with comments, mentions and file sharing in the Inspector.
Moving a Booking
You can move a booking by clicking once on the Booking and dragging it to the target time.
This will move the booking for all Involved.
On mac you can hold down the CMD key when making your selection, and select only that resource, if you only want to move the Booking for one resource.

You can also edit the start and end time in the Booking Inspector for all Involved, or editing each event for each Involved if you want them to have different times.
Crop/Extend a Booking
You can shorten or extend a booking by clicking once on the edge of the booking cell and dragging it to the target time. You will be presented with a confirmation of the new times.
On mac you can hold down the CMD key when making your selection, and select only that resource, if you only want to change the Booking for one resource.

You can also edit the start and end time in the Booking Inspector for all Involved, or editing each event for each Involved if you want them to have different in and out times.
Copy/Duplicate a Booking
You can copy a booking by clicking once on the Booking and holding down the option key while dragging it to the target time.
This will make a new copy of the booking with all the resources but at a new time.
Adding Involved to a Booking
You can add additional Members, Roles or Resources to a booking by dragging the resource name from the left to the booking event, until the green (+) sign shows. When you drop them there a new event will be created for them.
 Replacing Involved on a Booking
To replace one resource with another, drag the booking to the target row, or update those Involved in the Booking inspector.
Removing Involved from a Booking
To remove a resource, unselect it from the booking Inspector.
On Mac, you can also select the cell for only that resource , with a CMD+click, and then backspace to remove that resources
Recurring Bookings
You can make a Booking recurring on a schedule.
Go to the Options menu and select Repeat >Daily, Weekly, Monthly, Yearly, or Custom.
You can select from this list for the standard repeats, or Custom to access more advanced settings.

Selecting Custom allows to select advanced patterns, including end dates, skipped days and intervals
Select OK and the booking is set to repeat. it will now show on the schedule for the future recurrences too.
If you edit a Booking which is part of a recurrence, i.e changing Involved or time, you will be prompted if you want to update just that occurrence or also later ones.
A circular arrow shows in the top of the inspector to indicate that it is part of a repeating series. To edit the series, to the repeat menu again - selecting new options, or `Never` to stop any later repeats.

Deleting a Booking
On Web: open the Booking in the Inspector and go to the Options menu top right, then Delete Booking
Mac: Select the booking and backspace
Booking Templates
As a Workspace Admin, we can also add “Booking Templates”, which will help to populate the booking details for common booking types.
Go to Workspaces in the left menu, and double-click the workspace name.
Go to the “Booking Templates” tab and create a template for the Booking type you want to reuse.
Double-click on the Booking template to add a default description, color, and custom fields.
To learn more about the custom field types, check out our Task Templates training video.
When you create a new booking, you can select from the available booking templates in the Workspace, and complete the custom fields as they are set up.
The booking will be created with the color selected in the template.

Booking Templates can be made available as Requests, see related article on Booking Requests.
Booking Templates can also be of Type Personnel, which has special behaviour. These bookings are not linked to any project . More information in the Personnel Bookings article.
Scheduling Tasks
You can pin a Task or Subtask to the schedule, by setting the date and time it will start and end.
Notes:
- The Start/End are special fields that allow the Task to show in the schedule.
Note: It is no longer possible to set only the start or end date. If you need to set only one of them for your workflow, you will need to use a Task Template where those fields are renamed, or made mandatory, or hidden.
- In addition to Assigning Tasks to Members and Roles you can include Resources like rooms or equipment. Adding Resources is only possible when the Task has a start/end date.
- A Scheduled Task will be displayed in the schedule's Member, Role or Resource row.
Schedule an existing Task/Subtask
To Schedule a Task or subtask, select the Start/End date selector to select when the Task should be booked.
When the dates are selected you can also add Resources to the task, like equipment or rooms.

In the Schedule, the Task will show on the Assignee Member, Role or Resource row at the specified time.

You can also select one or multiple Tasks (or subtasks) and right-click to set the start/end date range and quickly get them on the Schedule.
It is also possible to create Bookings and link them to existing Tasks. This way the Tasks themselves are not scheduled, but the Bookings can refer to multiple Projects or Tasks happening at the Booking Time. If there are Bookings linked to Tasks you will see them in the Bookings tab in Task Details.

Create a New Scheduled Task
It's possible to create a new Task directly in the Schedule view, or by adding a Start and End date anywhere you can create a Tasks in Cirkus, including when submitting Tasks through the Requests view.
- On Mac Schedule: After creating the placeholder, either hold down the Option key, before clicking the + or go to the Add menu on the bottom right and click Add Task.
- On Web: after creating the placeholder, go to the + menu on the top right and click Add Task.
Mac:

Web:

You will be presented with the New Task Sheet with the selected date time completed.
From there you will need to select the Project, and can optionally select more Assignees and Resources then choose the name and create the Task.

You can also optionally add Schedule Status to your Scheduled Task if they are configured for your Workspace. Find out more about Schedule Statuses in this related article
Click OK and the Task is created in the project and on the schedule.

The Task will have a Schedule tab, and from here you can add additional resources. and edit the individual times, in case you want different booking times for each

Collaborate, Edit and Update Scheduled Tasks
Add Comments Files and Collaborate
You can add files, post comments and collaborate on a scheduled task as you would a normal task. @All (Task) mentions will be send to everyone involved on the tasks, both Assignees and Involved.

Moving a Task to a new time in the Schedule
You can move a Task by clicking once on the Task and dragging it to the target time.
This will move the Task for all Involved (Assignees)
On mac you can hold down the CMD key when making your selection, and select only to move the time of that resource.
 Crop/Extend a Scheduled Task
You can shorten or extend a Task by clicking once on the edge of the Task cell and dragging it to the target time. You will be presented with a confirmation of the new times.
On mac you can hold down the CMD key when making your selection, and select only that resource, if you only want to change the Task for one resource.
You can also edit the start/end time of each involved in the Schedule tab of the Task in the Inspector
Copy/Duplicate a Task
You can copy a Task by clicking once on the Task and holding down the option key while dragging it to the target time.
This will make a new copy of the Task with all the resources but at a new time.
Add Members, Roles, Resources to a Task
You can add additional Members, Roles or Resources to a Task by dragging the resource name from the left to the Task cell , until the green (+) sign shows. When you drop them there a new event will be created for them, and a confirmation dialog will show if they are being added as Assignee.
 Replace Members, Roles, Resources on a Task
To replace one resource with another, drag the Task to the target row, or update those ASsignees/Involved in the Task inspector.

Remove Members, Roles, Resources from a Task
To Remove a scheduled Assignee, go to the inspector and remove them from the Assigned To selector.
If they are a resource, remove from the Resources selector
If you are using Involved behaviour = Independent - remove them from the Involved selection
Recurring Tasks in the Schedule
As Recurring Tasks are created on the repeating times and tasks in the future are not created ahead of time, they will not block out resources in the future.
Start/End times need to be set manually on each recurrence when it is created
Options for Assignees and Involved on Scheduled Tasks
By default , if a task has Assignees and start/end date, it will show in those rows in the schedule.
Resources - rooms, suites, kit - never have a Task status and don't need to mark the task as "Done"
However, perhaps you want to book someone, but they will never need to mark the task as "Done".
You can control the behavior of Task Assignees and Involved by adjusting the Involved settings found in the Task options.
To find this setting, click on the three dots icon in the Task inspector, and select "Involved" from the dropdown menu.
The two modes you can select are Assignee and Independent.
Assignee
This is the default setting for all scheduled Tasks. In this mode you can assign a Task to Maria and also book out Avid2. Avid2 doesn't need to mark the Task as Done. All Assignees are also Scheduled.
If someone is added or removed as Assignee they will also be reflected in their Schedule row.

Independent
This is the non-default mode.
In this mode you can assign a Task to Dennis but you can also include Lisa as 'Involved' on the Task.
Lisa isn't an Assignee, she doesn't need to mark the Task as Done.
The Task will show in the Schedule in the Rows of the Involved only, but they don't need to be the same as the assignees

If you have a preferred way of working, these mode of Involved behaviour can also be set on Task templates:
See more information in theTask Template solution article.
Customise your Schedule View
Whether you want to emphasize Project workload, see confirmed bookings at a glance, or focus on your working hours, Cirkus has some options to customise your Schedule View.
Let’s see how!
- Step 0: Configure a Workspace Schedule Color Order (Workspace Setting for all users)
- Step 1: Prioritize Your Working Hours
- Step 2: Keep Track of Week Numbers (mac only)
- Step 3: Utilize the Indicator Bar
- Step 4: Apply Schedule Filters
- Step 5: Use the Personal Schedule view.
Step 0: Configure a Workspace Schedule Color Order (Workspace Admin Setting for all users)
As Workspace Administrator you can decide which colors should be used to fill the cells in the Schedule, and in which order.
This is set on the Workspace>Info > Schedule Settings, and once set applies to anyone viewing the Schedule of this Workspace.
The default settings and order is
1. Status Color (The color of the Schedule Status applied to each booking/task - if any i.e Confirmed, Draft etc)
2. Project Color (The color of the linked Subproject, and then Project of each Booking/Task)
3. Booking Color (The color of the Booking, or Booking Template applied to each Booking).
Items can be added or removed form this list, and the order can be rendered with drag and drop.
If no color is set the order will use the next available color.
Example 1
In this Workspace the Color Order is Booking Status first, so the color applied to the cell is that of the Status, in this case Green for Confirmed.
If a Booking or Task does not have a status it would default to the next color in the list, or show none, if none are set (like the Weekly meeting) Example 2
In this Workspace the Color Order is Project Color first, so the color applied to the cell is that of the linked Project, in this case Green for the Rainbow Man Project, and Pink for the “Big City Life - Mini Series”
Note: individual user preferences can be set to control the indicator bar, so that more than one piece of information is visible on the cell - see later Step 3
Step 1: Prioritize Your Working Hours
You can streamline your Schedule view to focus solely on your working hours, with our Hours of Interest setting, and Show/Hide Weekends.
- Navigate to the Cirkus Schedule preferences - Toolbar settings on mac, bottom bar gear icon on web.
- Look for the "Hours of Interest" feature and enable it.
- Adjust the parameters to define your preferred working hours. This will make hours outside of this view appear smaller in your schedule, allowing you to concentrate on your core work hours.
- Now adjust the "Weekends" setting, and you'll have three options: "Show," "Collapse," or "Hide."
"Show" will display weekends normally.
"Collapse” will condense weekends into a smaller section.
"Hide" will completely remove weekends from your view.
Choose the option that best suits your scheduling needs.

Step 2: Keep Track of Week Numbers (mac only)
Keeping tabs on the weeks is crucial for project management and planning. To display week numbers in your schedule view:
- Navigate to the Cirkus Schedule preferences - Toolbar settings on mac
- Locate the "Show Week Numbers" option and turn it on.
- You'll now see week numbers (1-52) displayed at the top of your schedule view, making it easier to organize tasks and activities by week.

Step 3: Utilize the Indicator Bar
The indicator bar is an essential element that provides visual cues for your schedule. You can customize it in various ways:
- Access the Cirkus Schedule preference again.
- Look for the "Indicator" settings.
- The options available are:
Time Reporting: This option shows a red or orange indicator for past Tasks or Bookings that have not been fully time reported for the user or row in your schedule.
Status Color: Choose this option to display the color of the Schedule Status for each Task or Booking in your schedule.
Booking Color: If you select this option, it will show the color of the Booking or Booking Template (applicable to bookings only).
Project Color: This option displays the color of the linked Subproject, or if no subproject is linked, it will use the color of the Project associated with the task or booking.
None: Choosing this option means that no indicator bar will be displayed in your schedule. It's ideal if you prefer a cleaner, indicator-free view.

Step 4: Apply Schedule Views
To customize your view of the team schedule, create a new view, or choose from shared Workspace views.
See related article on Custom Schedule Views.
Step 5: Use the Personal Schedule view.
You can switch to your own name on the schedule view, to see only your Scheduled Tasks and Bookings.
You can make Bookings in this view which are only visible to you, and will show as “unavailable” grey blocks to other users in the workspace.


Scheduling by Project - Schedule and Bookings list
In each Project there is a Schedule tab which shows all the Bookings and Scheduled Tasks of that project,
There is also a Bookings Tab in each Project, Subproject and Task which shows a list of the linked Bookings